Wednesday, 3 July 2013

Compiling the VICE Commodore emulator on Linux Mint 15

I've just upgraded my primary Linux box to Linux Mint 15. OK, I'm going to go off on a tangent for a moment. If you'd rather not read it, skip to the next paragraph. I really do like Mint. But the installation of version 15 was not nearly as smooth as it should have been. Getting X to run reliably at the proper resolution on my ASUS/Athlon motherboard with nVidia graphics card was far more difficult than it should have been. That along with several packages not actually working was rather frustrating. I have it all working quite well now, but that's what led me to compiling VICE from source.

I could not get the VICE Commodore emulator supplied by the Mint repository to work. I found several posts from other people having the same difficulties I was experiencing. So, since it wouldn't work and it was an old version, I decided the better option would be to download the source code and compile it myself.

The vanilla Mint 15 installation does not include a compiler or any of the other tools usually required to compile code. We also require several packages of header files as well. So, these must be installed before we can compile VICE. Install the following packages whichever way you prefer (I used the software manager):

  • build-essential
  • libxaw7-dev
  • libreadline-dev
  • libasound2-dev

VICE will compile without the libasound2-dev package (the header files for ALSA) but you won't have any sound.

With these packages installed simply follow the directions supplied with VICE to compile.

I should note here that you will not be able to run the VICE emulator without the appropriate ROM images for the computer you wish to emulate. This too is detailed in the documentation included with the source.

In my case I had an existing configuration file in ~/.vice/vicerc that had to be tweaked. Some of the old settings were incompatible with the new version. In theory a fresh install shouldn't encounter this.

In the end I had this:

So I could relive my childhood games like this:

Fixing the dead backslash and bar key on AIX 5.3

So the other day I was upgrading AIX on my IBM RS/6000 model 7046-B50 (actually, two of them) to 5300-12-05 and discovered that the system was rather rudely ignoring my attempts to type either a backslash or a bar. For a Unix system, this is quite a problem.

My system configuration is the aforementioned B50 connected through a StarTech SV831HD KVM switch to an IBM model M keyboard (built August 31, 1992 - nearly 21 years old and going strong, fantastic keyboard), a Microsoft optical mouse and an ASUS LCD monitor.

After poking around the internet for a solution I realised, unsurprisingly, that I'm not the only one to have experienced this phenomenon. What I realised subsequently was that there was very little in the way of a solution available. What I did determine was that the culprit was the wonky keymap file supplied by IBM. That was referenced a couple times. But how was I to fix it?

Step 1: What's the correct bloody keycode?

A short search led me to a tool called xev that reports on X events such as mouse movements and key presses. This will tell you what the keycode for the inactive backslash/bar key is. But first, you have to install the package that contains xev. It is not installed by default.

The package in question is X11.samples.apps.demos. I used Smit to install this from the AIX 5.3 media.

Now that xev is installed you merely need to execute it. The path is:

/usr/lpp/X11/Xamples/bin/xev

A small window pops up and you'll notice that if you move the mouse around or type keys a stream of text flows onto the shell. We're only interested in the keypress event when we type the backslash/bar key. This is the output I was interested in:

KeyPress event, serial 18, synthetic NO, window 0x3800001,
    root 0x29, subw 0x0, time 2798287790, (19,-20), root:(148,109),
    state 0x0, keycode 22 (keysym 0x0, NoSymbol), same_screen YES,
    XLookupString gives 0 characters:  ""

KeyRelease event, serial 18, synthetic NO, window 0x3800001,
    root 0x29, subw 0x0, time 2798287878, (19,-20), root:(148,109),
    state 0x0, keycode 22 (keysym 0x0, NoSymbol), same_screen YES,
    XLookupString gives 0 characters:  ""

And the most important part is highlighted. That's the keycode that is supposed to be mapped to the backslash/bar key.

Step 2: OK, now how do we make the key work?

Now all we need to do is correct the mapping. To do this we use xmodmap. The syntax is straightforward:

xmodmap -e 'keycode 22 = backslash bar'

Let's decipher this:

xmodmap
This is the command to execute, naturally.
-e
This indicates that what follows is an expression to be run.
keycode 22
We're going to state what keycode 22 should produce when typed.
backslash
The unshifted character to be typed is backslash.
bar
The shifted character to be typed is bar.

Note that the entire expression needs to be in quotes.

After executing the xmodmap command I had a fully functional backslash/bar key!

A couple notes about this:

  • This is a temporary fix. The next time you start X the keymapping will revert to the default. A permanent fix requires changing the keymap definition file. I haven't bothered to go that far yet.
  • This only works within the X session. If you log in from the console this will have no effect.

Because this change is transient I created a script to run. It's pretty basic:

#!/bin/sh

echo "Correct keymapping for backslash and bar."
echo "     xmodmap -e 'keycode 22 = backslash bar'"
xmodmap -e 'keycode 22 = backslash bar'

Has it been that long?

Wow! It's been nearly 5 years since I posted anything to this thing. Hokey smokes! Well, sometimes life gets in the way, particularly when it changes dramatically. However, I'm not about to get into that now. Suffice it to say, I haven't been experimenting with my collection of computers in quite some time. But I've just gotten the motivation back... and I have a couple posts.

I need to document some of this stuff. Some of it wasn't trivial to sort out. That's the reason I created this in the first place.

Friday, 8 August 2008

CPU upgrade to an IBM eServer xSeries 360

I recently purchased a refurbished IBM eServer xSeries 360 model/type 8686-7RX from I.T. Xchange. The server was new in 2003 and is a 4-way Intel 1.5 GHz Xeon MP (Gallatin) that initially came with a single CPU. I decided that since the price was right I'd upgrade to the full four CPUs. What follows is a series of photos taken during the operation.

Photo 1.  The start of the operation.  This is the server mounted in my rack.
Photo 2.  The cover is removed and the inside of the x360 is shown.
Photo 3.  Here is a photograph of one of the Intel 1.5 GHz Xeon MP Gallatin processors to be installed in my server.
Photo 4.  The heat sink stabiliser has been removed.  The single installed Xeon and the three empty sockets are visible.
Photo 5.  In this photo the three additional voltage regulator modules (VRM) have been installed (the blue plastic beside the processor sockets).
Photo 6.  Now the three Xeon MP processors have been inserted.  These are zero insertion force sockets (ZIF) so they just drop into place.  A locking arm snugs them up.
Photo 7.  And now the three new heat sinks have been installed.  These were refurbished CPUs and two of the heat sinks did not have enough bonding material so I added some to ensure proper heat transfer.
Photo 8.  And here is the completed server minus the heat sink stabiliser.

When I powered the system back up everything looked perfect.  The BIOS and OpenSUSE 11.0 now saw four CPUs.  I have hyperthreading enabled so OpenSUSE sees a total of eight cores.  Here's what /proc/cpuinfo looks like for this server:

processor : 0
vendor_id : GenuineIntel
cpu family : 15
model : 2
model name : Intel(R) XEON(TM) MP CPU 1.50GHz
stepping : 2
cpu MHz : 1500.383
cache size : 1024 KB
physical id : 0
siblings : 2
core id : 0
cpu cores : 1
fdiv_bug : no
hlt_bug : no
f00f_bug : no
coma_bug : no
fpu : yes
fpu_exception : yes
cpuid level : 2
wp : yes
flags : fpu vme de pse tsc msr pae mce cx8 apic sep mtrr pge mca cmov pat pse36 clflush dts acpi mmx fxsr sse sse2 ss ht tm pebs bts
bogomips : 3005.62
clflush size : 64

processor : 1
vendor_id : GenuineIntel
cpu family : 15
model : 2
model name : Intel(R) XEON(TM) MP CPU 1.50GHz
stepping : 2
cpu MHz : 1500.383
cache size : 1024 KB
physical id : 0
siblings : 2
core id : 0
cpu cores : 1
fdiv_bug : no
hlt_bug : no
f00f_bug : no
coma_bug : no
fpu : yes
fpu_exception : yes
cpuid level : 2
wp : yes
flags : fpu vme de pse tsc msr pae mce cx8 apic sep mtrr pge mca cmov pat pse36 clflush dts acpi mmx fxsr sse sse2 ss ht tm pebs bts
bogomips : 3000.82
clflush size : 64

processor : 2
vendor_id : GenuineIntel
cpu family : 15
model : 2
model name : Intel(R) XEON(TM) MP CPU 1.50GHz
stepping : 2
cpu MHz : 1500.383
cache size : 1024 KB
physical id : 1
siblings : 2
core id : 0
cpu cores : 1
fdiv_bug : no
hlt_bug : no
f00f_bug : no
coma_bug : no
fpu : yes
fpu_exception : yes
cpuid level : 2
wp : yes
flags : fpu vme de pse tsc msr pae mce cx8 apic sep mtrr pge mca cmov pat pse36 clflush dts acpi mmx fxsr sse sse2 ss ht tm pebs bts
bogomips : 3000.76
clflush size : 64

processor : 3
vendor_id : GenuineIntel
cpu family : 15
model : 2
model name : Intel(R) XEON(TM) MP CPU 1.50GHz
stepping : 2
cpu MHz : 1500.383
cache size : 1024 KB
physical id : 1
siblings : 2
core id : 0
cpu cores : 1
fdiv_bug : no
hlt_bug : no
f00f_bug : no
coma_bug : no
fpu : yes
fpu_exception : yes
cpuid level : 2
wp : yes
flags : fpu vme de pse tsc msr pae mce cx8 apic sep mtrr pge mca cmov pat pse36 clflush dts acpi mmx fxsr sse sse2 ss ht tm pebs bts
bogomips : 3000.84
clflush size : 64

processor : 4
vendor_id : GenuineIntel
cpu family : 15
model : 2
model name : Intel(R) XEON(TM) MP CPU 1.50GHz
stepping : 2
cpu MHz : 1500.383
cache size : 1024 KB
physical id : 2
siblings : 2
core id : 0
cpu cores : 1
fdiv_bug : no
hlt_bug : no
f00f_bug : no
coma_bug : no
fpu : yes
fpu_exception : yes
cpuid level : 2
wp : yes
flags : fpu vme de pse tsc msr pae mce cx8 apic sep mtrr pge mca cmov pat pse36 clflush dts acpi mmx fxsr sse sse2 ss ht tm pebs bts
bogomips : 3000.86
clflush size : 64

processor : 5
vendor_id : GenuineIntel
cpu family : 15
model : 2
model name : Intel(R) XEON(TM) MP CPU 1.50GHz
stepping : 2
cpu MHz : 1500.383
cache size : 1024 KB
physical id : 2
siblings : 2
core id : 0
cpu cores : 1
fdiv_bug : no
hlt_bug : no
f00f_bug : no
coma_bug : no
fpu : yes
fpu_exception : yes
cpuid level : 2
wp : yes
flags : fpu vme de pse tsc msr pae mce cx8 apic sep mtrr pge mca cmov pat pse36 clflush dts acpi mmx fxsr sse sse2 ss ht tm pebs bts
bogomips : 3000.75
clflush size : 64

processor : 6
vendor_id : GenuineIntel
cpu family : 15
model : 2
model name : Intel(R) XEON(TM) MP CPU 1.50GHz
stepping : 2
cpu MHz : 1500.383
cache size : 1024 KB
physical id : 3
siblings : 2
core id : 0
cpu cores : 1
fdiv_bug : no
hlt_bug : no
f00f_bug : no
coma_bug : no
fpu : yes
fpu_exception : yes
cpuid level : 2
wp : yes
flags : fpu vme de pse tsc msr pae mce cx8 apic sep mtrr pge mca cmov pat pse36 clflush dts acpi mmx fxsr sse sse2 ss ht tm pebs bts
bogomips : 3000.81
clflush size : 64

processor : 7
vendor_id : GenuineIntel
cpu family : 15
model : 2
model name : Intel(R) XEON(TM) MP CPU 1.50GHz
stepping : 2
cpu MHz : 1500.383
cache size : 1024 KB
physical id : 3
siblings : 2
core id : 0
cpu cores : 1
fdiv_bug : no
hlt_bug : no
f00f_bug : no
coma_bug : no
fpu : yes
fpu_exception : yes
cpuid level : 2
wp : yes
flags : fpu vme de pse tsc msr pae mce cx8 apic sep mtrr pge mca cmov pat pse36 clflush dts acpi mmx fxsr sse sse2 ss ht tm pebs bts
bogomips : 3000.86
clflush size : 64


Thursday, 28 June 2007

Setting up a Gateway GT5220


Well, I bought a refurbished Gateway GT5220 computer from Tiger Direct. I had the computer delivered and the very first thing I did was insert my Acronis True Image CD to make an image of the hard drive even before I booted the machine. I wanted to have a perfect recovery for down the road. I noticed when True Image was booting from the CD that I got several "hdc: lost interrupt" messages before the application screen presented itself. Initially I thought it sort of odd, but True Image was working and allowed me to make a backup image.

After the backup was made I booted Windows XP Media Center for the first time. I went through the initial boot process and made my way to the Windows desktop. The first thing I did, because I despise the Windows XP desktop design, was to change the theme to Windows Classic. Ah, much better.

The next step was to eliminate the proliferance of "crapware" that comes preloaded on these types of computers. Good thing it was cheap. So, I removed all of:
  • AOL (ugh!)
  • BigFix
  • Google Desktop
  • Google Toolbar
  • MS Money
  • MS Office demo
  • MS Works
  • Napster
  • Real Player (ewwww!)
  • McAfee Antivirus
There will probably be more to go later, but that was a start. Following that I ran through Windows Update to get all the latest patches.

Next I wanted to install a bit of software. I attempted to insert a CD into the DVD drive and that's when the fun began. The drive tray would not open. Wha??? I went to Windows Explorer and noticed that the DVD drive was not listed.

I experienced some rather odd behaviour of this drive. The BIOS was able to see the drive and identify it correctly and I was able to boot from it. However, when the computer had loaded an operating system, the DVD drive either failed to operate or was not recognized.

I spent a few hours at a time (so I wouldn't go insane) over the span of a week trying to figure out what was wrong. I checked:
  • BIOS settings
  • Windows settings
  • editing the registry per a Microsoft tech note
  • disabling devices (eg. SATA, parallel port, serial ports)
  • removing the modem
  • exchanging the power supply
  • exchanging the DVD drive
  • exchanging the IDE cable... AHA!!!
Evidently the IDE cable shipped with this Gateway computer was borfed. I cabbaged one out of a dead server I had and lo and behold I had a working DVD drive!

During this time I also enlisted the help of Gateway support since I was entitled. They were insistent that I needed to return a faulty DVD drive. Considering I could actually boot from the CD, I couldn't believe that it was the drive causing the issue. So, the final score is:
  • Brian 1 : Gateway 0
I'm feeling much better about the situation now.

Thursday, 31 May 2007

DV Video Capture Troubles

OK... I just spent the last hour trying to figure out why my video capture was very choppy.

For some background, I'm using the following:
So, I made my first captures using Final Cut Express HD. I just purchased the software and was looking forward to playing with it. My first video captures were abysmal. The video and audio were very choppy appearing as though some of the data was being dropped. I changed out the firewire cable, tried using iMovie to capture instead, and changed tapes; all to no avail.

Eventually, after getting very frustrated, I noticed something. The problems occurred based on where I held the ZR500. Aha!!! It appears that my Wacom Intuos tablet was causing intereference to the ZR500. Originally I had placed the ZR500 next to the tablet because it was a convenient location. Apparently that was a bad idea. Once I moved the camera to the opposite side of my desk everything worked perfectly. I'd never considered the possibility of interference.

Lesson learned today: Do not place a camcorder near a Wacom graphics tablet!

I'm glad I managed to finally sort that one out.

Wednesday, 9 May 2007

The 1.5 TB File Server: Part 2

(See part 1.)

This is the build of the server up to the point where the 3Ware RAID is to be set up. The card is on order and I'll be getting it last.

This is not intended to be an installation guide. Refer to the manuals provided with all the components for that. This is just an overview pointing out things I needed to watch out for.


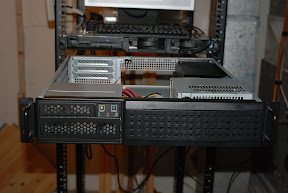
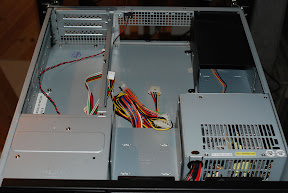
The case mounted in the rack.

The first two photos are of the Chenbro 22300 chassis that I mounted into my APC 43U rack. The server above it, by the way, is an IBM x335 dual Xeon that will become an application and web server. But that's another project.

My first step was to install the motherboard. I first removed the support for the riser card, the CD/floppy cage, and both hard disk cages to give me as much room as possible.


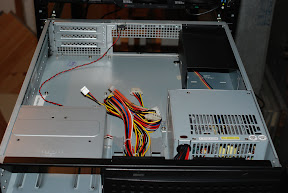
The case with obstacles removed.

Then I installed the rear I/O bezel and the motherboard. This case requires a screw insert to be placed in one of the screw holes in order to mount the motherboard. I missed it the first time and had to remove the motherboard and reinstall. D'oh! I gently tightened the nine screws.


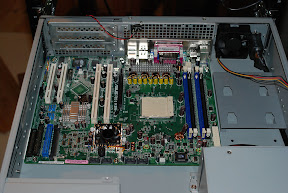
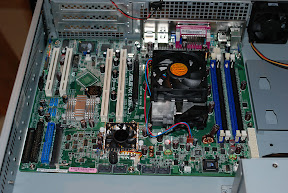
The Asus K8N-LR installed.

Next the AMD Opteron 148 was inserted into the 939 pin socket. Lift the lever up to 90 degrees, align the triangle "notch" (top left in the first photo, bottom left in the second), insert the processor, and gently move the lever back into place.


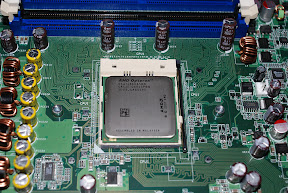
The Opteron CPU in place.

After the CPU is secured the heat sink and fan must be installed. A plastic retainer is supplied with the Asus motherboard. This is screwed into place with two screws. Then some conductive CPU goo is applied to the surface of the Opteron to cover it. The heat sink is placed on top and clipped into place. Of course remember to connect the fan to a power outlet on the motherboard. I plugged it into the connector marked "CPU_FAN1" which was convenient.


The heat sink installed.

The Chenbro case is equipped with two front fans and one rear fan. Because the nVidia SLI chip's fan was plugged into the "FRNT_FAN1" connector, it was necessary to plug one of the front fans into the "CPU_FAN2" plug while the second fan on the front of the case could be plugged into the "FRNT_FAN1" connector. The rear fan was plugged into the "REAR_FAN1" connector which left the "REAR_FAN2" connector open if I decide to add another rear fan.

The Kingston RAM was installed into the two blue DIMM slots. Pretty standard stuff. Next I connected all the switches and LED's on the case. The Chenbro 22300 is equipped with an intrusion switch which I connected to the appropriate AUX_PANEL1 pins. First the existing jumper needed to be removed.

The fun came when attaching the other switches and the LED's. The power and reset switches were straightforward connecting as per the Asus documentation. However, when I hooked up the LED's only the HDD light worked straight away. This connector worked as per the Asus documentation.

The first problem was the power LED. The motherboard expects a 3-pin connector but Chenbro supplies a single pin "POWER" connector and a single pin "GRND" connector. After a bit of trial and error I determined that connecting the "POWER" connector to the pin marked "POWERLED+" and the "GND" connector to the pin marked "POWERLED-" enabled the power LED on the front panel.

Next I tackled the LAN LED. Initially I connected the case's LAN connector to the pins marked "LAN1_LINKACTLED+" and "LAN1_LINKACTLED-" because I intended to use what Linux considers "eth0", or the first ethernet port. Nothing. So, on a whim I tried the pins marked "LAN2_LINKACTLED+" and "LAN2_LINKACTLED-". Bingo! The activity LED illuminated properly. So, either Linux thinks they're reversed, or the Asus motherboard does.

Next I installed the LG DVDRW drive and my Western Digital OS hard disk in the CD/floppy cage. The 250 GB hard disk didn't fit well into the floppy mounting holes so it was necessary to drill my own holes. Not a big deal. Then I inserted the cage and connected the drives to the on-board IDE connectors and to power. I put the hard disk on the primary IDE channel and the DVDRW on the secondary IDE channel. I also installed all four Seagate SATA drives in their cages and installed the cages. Since I don't have the 3Ware RAID card yet, I didn't hook up power or data.

Next I went to plug the power supply into the motherboard. What? The power supply that came with the Chenbro 22300 only included a 20-pin power connector but the Asus K8N-LR is equipped with a 24-pin connector. I had to go pick up a 20 to 24-pin adapter cable to solve that problem. OK, the power is connected. Let's install the riser card. You're kidding me. It won't fit. Right, the default riser card supplied by Chenbro is a PCI x3 riser card. Unfortunately the K8N-LR requires a PCI-X x2/PCI x1 riser card. I had to order that so I don't have it installed yet. No bother, I don't have the RAID card to install yet either.


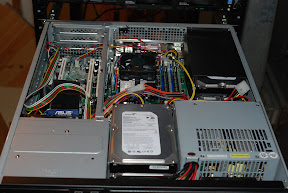
The case with all the received parts installed.

To test the system I booted from a Knoppix v5.1 live CD. These are quite useful because they're packed with all sorts of great utilities. The above trials with the front panel LED's were all tested with Knoppix. I spent some time with the server running Knoppix to test everything out. I must have done something right because everything (aside from the LED's) worked properly straight away.


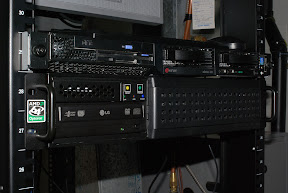
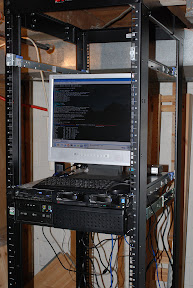
The system running Knoppix in the rack.

Now the only steps left are to install the operating system (Kubuntu Linux for this server), install the riser card, and install and configure the 3Ware RAID controller.