OK... I just spent the last hour trying to figure out why my video capture was very choppy.
For some background, I'm using the following:
So, I made my first captures using Final Cut Express HD. I just purchased the software and was looking forward to playing with it. My first video captures were abysmal. The video and audio were very choppy appearing as though some of the data was being dropped. I changed out the firewire cable, tried using iMovie to capture instead, and changed tapes; all to no avail.
Eventually, after getting very frustrated, I noticed something. The problems occurred based on where I held the ZR500. Aha!!! It appears that my Wacom Intuos tablet was causing intereference to the ZR500. Originally I had placed the ZR500 next to the tablet because it was a convenient location. Apparently that was a bad idea. Once I moved the camera to the opposite side of my desk everything worked perfectly. I'd never considered the possibility of interference.
Lesson learned today: Do not place a camcorder near a Wacom graphics tablet!
I'm glad I managed to finally sort that one out.
Thursday, 31 May 2007
Wednesday, 9 May 2007
The 1.5 TB File Server: Part 2
(See part 1.)
This is the build of the server up to the point where the 3Ware RAID is to be set up. The card is on order and I'll be getting it last.
This is not intended to be an installation guide. Refer to the manuals provided with all the components for that. This is just an overview pointing out things I needed to watch out for.
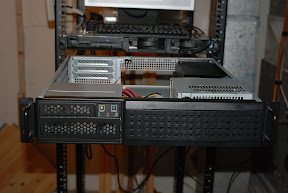
The case mounted in the rack.
The first two photos are of the Chenbro 22300 chassis that I mounted into my APC 43U rack. The server above it, by the way, is an IBM x335 dual Xeon that will become an application and web server. But that's another project.
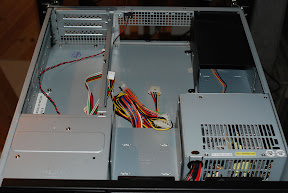
My first step was to install the motherboard. I first removed the support for the riser card, the CD/floppy cage, and both hard disk cages to give me as much room as possible.
The case with obstacles removed.
Then I installed the rear I/O bezel and the motherboard. This case requires a screw insert to be placed in one of the screw holes in order to mount the motherboard. I missed it the first time and had to remove the motherboard and reinstall. D'oh! I gently tightened the nine screws.
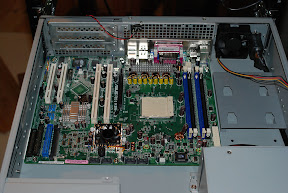
The Asus K8N-LR installed.
Next the AMD Opteron 148 was inserted into the 939 pin socket. Lift the lever up to 90 degrees, align the triangle "notch" (top left in the first photo, bottom left in the second), insert the processor, and gently move the lever back into place.

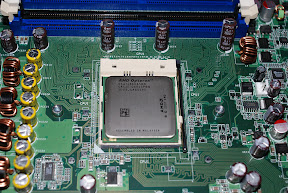
The Opteron CPU in place.
After the CPU is secured the heat sink and fan must be installed. A plastic retainer is supplied with the Asus motherboard. This is screwed into place with two screws. Then some conductive CPU goo is applied to the surface of the Opteron to cover it. The heat sink is placed on top and clipped into place. Of course remember to connect the fan to a power outlet on the motherboard. I plugged it into the connector marked "CPU_FAN1" which was convenient.
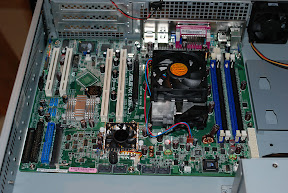
The heat sink installed.
The Chenbro case is equipped with two front fans and one rear fan. Because the nVidia SLI chip's fan was plugged into the "FRNT_FAN1" connector, it was necessary to plug one of the front fans into the "CPU_FAN2" plug while the second fan on the front of the case could be plugged into the "FRNT_FAN1" connector. The rear fan was plugged into the "REAR_FAN1" connector which left the "REAR_FAN2" connector open if I decide to add another rear fan.
The Kingston RAM was installed into the two blue DIMM slots. Pretty standard stuff. Next I connected all the switches and LED's on the case. The Chenbro 22300 is equipped with an intrusion switch which I connected to the appropriate AUX_PANEL1 pins. First the existing jumper needed to be removed.
The fun came when attaching the other switches and the LED's. The power and reset switches were straightforward connecting as per the Asus documentation. However, when I hooked up the LED's only the HDD light worked straight away. This connector worked as per the Asus documentation.
The first problem was the power LED. The motherboard expects a 3-pin connector but Chenbro supplies a single pin "POWER" connector and a single pin "GRND" connector. After a bit of trial and error I determined that connecting the "POWER" connector to the pin marked "POWERLED+" and the "GND" connector to the pin marked "POWERLED-" enabled the power LED on the front panel.
Next I tackled the LAN LED. Initially I connected the case's LAN connector to the pins marked "LAN1_LINKACTLED+" and "LAN1_LINKACTLED-" because I intended to use what Linux considers "eth0", or the first ethernet port. Nothing. So, on a whim I tried the pins marked "LAN2_LINKACTLED+" and "LAN2_LINKACTLED-". Bingo! The activity LED illuminated properly. So, either Linux thinks they're reversed, or the Asus motherboard does.
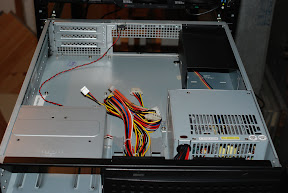
Next I installed the LG DVDRW drive and my Western Digital OS hard disk in the CD/floppy cage. The 250 GB hard disk didn't fit well into the floppy mounting holes so it was necessary to drill my own holes. Not a big deal. Then I inserted the cage and connected the drives to the on-board IDE connectors and to power. I put the hard disk on the primary IDE channel and the DVDRW on the secondary IDE channel. I also installed all four Seagate SATA drives in their cages and installed the cages. Since I don't have the 3Ware RAID card yet, I didn't hook up power or data.
Next I went to plug the power supply into the motherboard. What? The power supply that came with the Chenbro 22300 only included a 20-pin power connector but the Asus K8N-LR is equipped with a 24-pin connector. I had to go pick up a 20 to 24-pin adapter cable to solve that problem. OK, the power is connected. Let's install the riser card. You're kidding me. It won't fit. Right, the default riser card supplied by Chenbro is a PCI x3 riser card. Unfortunately the K8N-LR requires a PCI-X x2/PCI x1 riser card. I had to order that so I don't have it installed yet. No bother, I don't have the RAID card to install yet either.
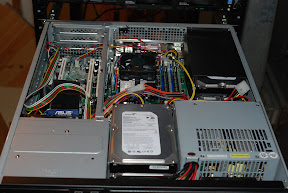
The case with all the received parts installed.
To test the system I booted from a Knoppix v5.1 live CD. These are quite useful because they're packed with all sorts of great utilities. The above trials with the front panel LED's were all tested with Knoppix. I spent some time with the server running Knoppix to test everything out. I must have done something right because everything (aside from the LED's) worked properly straight away.
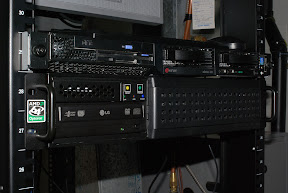
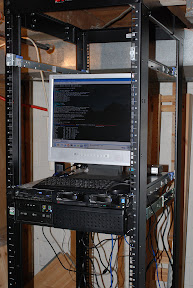
The system running Knoppix in the rack.
Now the only steps left are to install the operating system (Kubuntu Linux for this server), install the riser card, and install and configure the 3Ware RAID controller.
This is the build of the server up to the point where the 3Ware RAID is to be set up. The card is on order and I'll be getting it last.
This is not intended to be an installation guide. Refer to the manuals provided with all the components for that. This is just an overview pointing out things I needed to watch out for.


The case mounted in the rack.
The first two photos are of the Chenbro 22300 chassis that I mounted into my APC 43U rack. The server above it, by the way, is an IBM x335 dual Xeon that will become an application and web server. But that's another project.
My first step was to install the motherboard. I first removed the support for the riser card, the CD/floppy cage, and both hard disk cages to give me as much room as possible.

The case with obstacles removed.
Then I installed the rear I/O bezel and the motherboard. This case requires a screw insert to be placed in one of the screw holes in order to mount the motherboard. I missed it the first time and had to remove the motherboard and reinstall. D'oh! I gently tightened the nine screws.

The Asus K8N-LR installed.
Next the AMD Opteron 148 was inserted into the 939 pin socket. Lift the lever up to 90 degrees, align the triangle "notch" (top left in the first photo, bottom left in the second), insert the processor, and gently move the lever back into place.


The Opteron CPU in place.
After the CPU is secured the heat sink and fan must be installed. A plastic retainer is supplied with the Asus motherboard. This is screwed into place with two screws. Then some conductive CPU goo is applied to the surface of the Opteron to cover it. The heat sink is placed on top and clipped into place. Of course remember to connect the fan to a power outlet on the motherboard. I plugged it into the connector marked "CPU_FAN1" which was convenient.

The heat sink installed.
The Chenbro case is equipped with two front fans and one rear fan. Because the nVidia SLI chip's fan was plugged into the "FRNT_FAN1" connector, it was necessary to plug one of the front fans into the "CPU_FAN2" plug while the second fan on the front of the case could be plugged into the "FRNT_FAN1" connector. The rear fan was plugged into the "REAR_FAN1" connector which left the "REAR_FAN2" connector open if I decide to add another rear fan.
The Kingston RAM was installed into the two blue DIMM slots. Pretty standard stuff. Next I connected all the switches and LED's on the case. The Chenbro 22300 is equipped with an intrusion switch which I connected to the appropriate AUX_PANEL1 pins. First the existing jumper needed to be removed.
The fun came when attaching the other switches and the LED's. The power and reset switches were straightforward connecting as per the Asus documentation. However, when I hooked up the LED's only the HDD light worked straight away. This connector worked as per the Asus documentation.
The first problem was the power LED. The motherboard expects a 3-pin connector but Chenbro supplies a single pin "POWER" connector and a single pin "GRND" connector. After a bit of trial and error I determined that connecting the "POWER" connector to the pin marked "POWERLED+" and the "GND" connector to the pin marked "POWERLED-" enabled the power LED on the front panel.
Next I tackled the LAN LED. Initially I connected the case's LAN connector to the pins marked "LAN1_LINKACTLED+" and "LAN1_LINKACTLED-" because I intended to use what Linux considers "eth0", or the first ethernet port. Nothing. So, on a whim I tried the pins marked "LAN2_LINKACTLED+" and "LAN2_LINKACTLED-". Bingo! The activity LED illuminated properly. So, either Linux thinks they're reversed, or the Asus motherboard does.
Next I installed the LG DVDRW drive and my Western Digital OS hard disk in the CD/floppy cage. The 250 GB hard disk didn't fit well into the floppy mounting holes so it was necessary to drill my own holes. Not a big deal. Then I inserted the cage and connected the drives to the on-board IDE connectors and to power. I put the hard disk on the primary IDE channel and the DVDRW on the secondary IDE channel. I also installed all four Seagate SATA drives in their cages and installed the cages. Since I don't have the 3Ware RAID card yet, I didn't hook up power or data.
Next I went to plug the power supply into the motherboard. What? The power supply that came with the Chenbro 22300 only included a 20-pin power connector but the Asus K8N-LR is equipped with a 24-pin connector. I had to go pick up a 20 to 24-pin adapter cable to solve that problem. OK, the power is connected. Let's install the riser card. You're kidding me. It won't fit. Right, the default riser card supplied by Chenbro is a PCI x3 riser card. Unfortunately the K8N-LR requires a PCI-X x2/PCI x1 riser card. I had to order that so I don't have it installed yet. No bother, I don't have the RAID card to install yet either.

The case with all the received parts installed.
To test the system I booted from a Knoppix v5.1 live CD. These are quite useful because they're packed with all sorts of great utilities. The above trials with the front panel LED's were all tested with Knoppix. I spent some time with the server running Knoppix to test everything out. I must have done something right because everything (aside from the LED's) worked properly straight away.


The system running Knoppix in the rack.
Now the only steps left are to install the operating system (Kubuntu Linux for this server), install the riser card, and install and configure the 3Ware RAID controller.
The 1.5 TB File Server: Part 1
(See part 2.)
Since I'm an amateur photographer I tend to use disk space very quickly. Most is not consumed by digital photography however. I have a large collection of slides that have been scanned at 4800 dpi. Each file is approximately 50 MB so this adds up very quickly. Thus, I decided that I would build a relatively large file server to hold my photography.
What I'm going to do in this post is summarize the configuration I came up with and explain my decisions. So, first the parts list:
Chenbro 22300
My requirements for a case were that it be relatively compact and have room for four SATA drives for my RAID 5 configuration. I looked around and decided that a 2U case would work fine. Later on I decided to leave the operating system off the RAID and put it on its own disk. Thus, the floppy drive slot would be used for the fifth disk. Based on availability and my requirements I came up with the Chenbro case with the assistance of my local store.
Next I'll start with the build.
Since I'm an amateur photographer I tend to use disk space very quickly. Most is not consumed by digital photography however. I have a large collection of slides that have been scanned at 4800 dpi. Each file is approximately 50 MB so this adds up very quickly. Thus, I decided that I would build a relatively large file server to hold my photography.
What I'm going to do in this post is summarize the configuration I came up with and explain my decisions. So, first the parts list:
- Chenbro 22300 2U rack mount case with 300 watt PSU
- ASUS K8N-LR motherboard
- AMD Opteron 148 socket-939 processor
- 2x Kingston KVR400X72C3A/512 ECC RAM
- LG SuperMulti DVDRW GSA-H50N
- 3Ware SATA RAID controller 9550SX-4LP
- 4x Seagate 500 GB SATA hard disk
- Western Digital 250 GB EIDE hard disk I had lying around for the OS
Chenbro 22300
My requirements for a case were that it be relatively compact and have room for four SATA drives for my RAID 5 configuration. I looked around and decided that a 2U case would work fine. Later on I decided to leave the operating system off the RAID and put it on its own disk. Thus, the floppy drive slot would be used for the fifth disk. Based on availability and my requirements I came up with the Chenbro case with the assistance of my local store.ASUS K8N-LR
I have a 1U IBM Opteron server that hosts my websites. I really like the performance of that server and also my Athlon 64 X2 that I have at home. Thus, I chose to go with an Opteron motherboard for this build. Based on support given by Chenbro, I selected this motherboard. It met all my criteria for a motherboard (eg. Opteron, dual channel RAM, dual gigabit ethernet, etc.) and was one of the few AMD options listed.Opteron 148
The Opteron was the chosen architecture based on my experiences above. The model 148 was chosen purely based on cost. Once we went beyond the 148 the prices increased exponentially. This processor is more than enough for a file server and was attractively priced.Kingston RAM
This ram was chosen because I trust Kingston and because it was the suggested RAM on their website. I also chose two 512 MB DIMM's to take advantage of the dual channel mode. One gigabyte of RAM is plenty for this server.LG DVDRW
I wanted to use a DVD recorder in this server so that I could easily move files to DVD or CD from the file server itself without having to copy them to another computer over the network. My local store supplies LG equipment so although I've never used one before, I gave it a try. We'll see how well it works out. At a minimum I require a CDROM to install the OS.3Ware SATA RAID
I opted for this RAID controller over the on-board controller or most others because it is a true hardware RAID. The system CPU is not required for parity calculation. All work is performed by the controller itself. In fact, the 3Ware 9550SX-4LP utilizes a PowerPC processor. I also checked around and decided that 3Ware's support for multiple OS's is excellent. I'll be configuring my SATA drives in a RAID level 5.Seagate 500 GB drives
Seagate was my only drive option for this build because of their 5-year warranty and reliability. I chose 500 GB drives because of the cost per GB ratio. Drives above 500 GB cost more per GB. Four of these drives in RAID level 5 will give me about 1.5 TB of storage. That should keep me going for a while anyway.Western Digital 250 GB drive
This drive is just one that was in a failed server I had already. I decided to leave the OS off the RAID and this was the best drive I had available.Next I'll start with the build.
Subscribe to:
Comments (Atom)